Rank: Member
Groups: Registered
Joined: 28/07/2007(UTC)
Posts: 76
|
Aidan,
Not sure of the paint code, but it is a Holden colour called "Antelope". Usually found on HX Premiers from memory.Perhaps one of the guys could help with the code.
Howabout posting some pics of yours as I havent seen another one anywhere.
Cheers Trev...
|
|
|
|
|
|
Rank: Member
Groups: Registered
Joined: 16/06/2005(UTC)
Posts: 424
|
Google = Antelope / 2G006 / used from 1974 - 1978 / Metallic paint.
HTH
___________________
Why are you reading this, you should be looking up there^^
Joetech Tonner - coming soon! |
___________________
- HJ turbotonner looks and goes like a sneezing rhino on heat! - |
|
|
|
|
|
Rank: Member
Groups: Registered
Joined: 7/11/2008(UTC)
Posts: 96
|
Hey trev do you have any progress photos and hints on how to trackle the sill repair?? I need to do this as mine are fooked..
Also Im interested in cowl panel repair as mine are also rusting out..
And finally the section of the tray right behind rear window is quite rusty!
Did you use rare spares products or did you make your own? details please hehe
|
|
|
|
|
|
Rank: Member
Groups: Registered
Joined: 29/10/2008(UTC)
Posts: 18
|
Gday Trev,
Good onya cobba, sheds with projects like yours keep all of us on the edge of our seat and provide much needed insiration to finish our own cars.
Well done mate!
|
|
|
|
|
|
Rank: Member
Groups: Registered
Joined: 23/06/2009(UTC)
Posts: 4
|
|
|
|
|
|
|
Rank: Member
Groups: Registered
Joined: 19/05/2009(UTC)
Posts: 210
|
hey trev looks youve done an awesome job from scratch, the crate engine should go a treat
|
|
|
|
|
|
Rank: Member
Groups: Registered
Joined: 28/07/2007(UTC)
Posts: 76
|
Thanks for the comments guys.
As for the sill repairs, I did ot do these as the previous owner had put in the hard work for me. I know that he made his own from 1.6mm plate and then welded them into place. (hence no body line behind the door at the top of the sill). I did not have to replace or repair the cowls as the car had lived all its life in the north west where it dosent rain much so there was minimal rust in this area. The area behind the cab was made from 3mm plate that I had laying around. I did this by making a template from cardboard and then cutting out the steel. lots of trial and error but finaly got there.
Im glad it inspires you all to carry on.
Cheers Trev...
|
|
|
|
|
|
Rank: Member
Groups: Registered
Joined: 2/05/2008(UTC)
Posts: 11
|
great ute trev!
do you have any photos of your stereo setup in your rear shelf
i have the same type of shelf in my WB and am looking at my options for a new stereo
cheers
|
|
|
|
|
|
Rank: Member
Groups: Registered
Joined: 13/06/2007(UTC)
Posts: 113
|
Great ute bud, Blown away thats ya first atempt. Looks unreal. how did you go about filling your tonneau hook holes, were they welded or filled, am in the same process at the moment but have been told welding will warp,and filling will ring?
Cheers
|
|
|
|
|
|
Rank: Member
Groups: Registered
Joined: 28/07/2007(UTC)
Posts: 76
|
BadWB
As for the tonneau holes, I did mig weld them up but you have to be very carefull as to keep as much heat away from the steel as possible. Mine did warp a little and required some teasing back into shape afterwards. I have heard that if you place a block of brass or copper behind the hole before welding it, then it will absorb the heat and reduce the amount of distortion due to the heat. (perhaps one of the boily gurus on site can clarify this). Overall if you can keep the area straight then you will save a hell of a lot of work afterwards.
Cheers Trev...
|
|
|
|
|
|
Rank: Member
Groups: Registered
Joined: 8/06/2009(UTC)
Posts: 217
|
Well done a fantastic job!
"We are but a grain of sand on the beach of life" |
"We are but a grain of sand on the beach of life" |
|
|
|
|
|
Rank: Member
Groups: Registered
Joined: 7/03/2010(UTC)
Posts: 10
|
Great ute resto especially the new chevy 350 crate engine. I am starting the install of a similar GM crate engine in a HQ and can see a couple of issues you must have already solved. One is the air cleaner to hood clearance - you seem to have a taller inlet manifold than the standard HQ factory 350 - was that a problem? Secondly, the headers - what model Pacemaker were they and how did the go for clearances around chassis, starter, etc? Could you possibly take a few more photos so I can see how much clearance there is between the headers and the front drivers side spark plug. I have aluminum heads with angled spark plug mounting which supposedly dont have enough clearance around the pacemaker headers Phil
quote:
Originally posted by trev10
About 12 months ago I was offered a deal I couldnt refuse. A mate of mine was moving house and decided he couldnt take his ute with him. He offered it to me for the cost of transfer which was $37. He had already stripped and repainted the chasis, all suspension components, added power steering,disk brakes with booster,new sills,rst repaired and purchased many components off ebay and elsewhere for the build.Since then I have been spending quite a few hours and dollars on it.
Originally it was a 73 HQ with a 173,cloumn shift trimatic,banjo as per pic below.
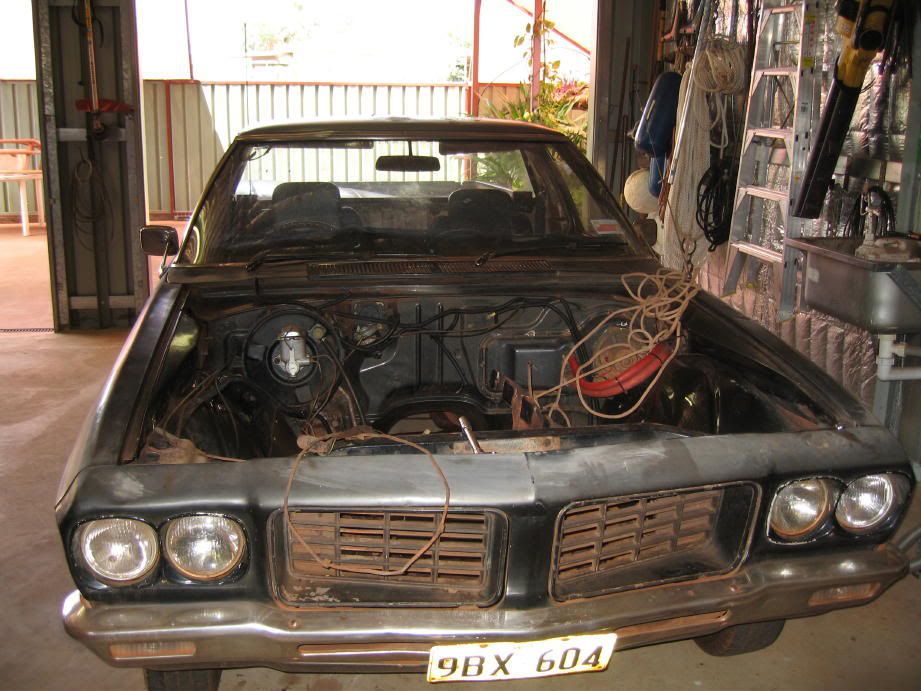
More to come just wanna see if I got this photobucket thing sorted first.
Trev...
|
|
|
|
|
|
Rank: Member
Groups: Registered
Joined: 7/03/2010(UTC)
Posts: 10
|
quote:
Originally posted by trev10
About 12 months ago I was offered a deal I couldnt refuse. A mate of mine was moving house and decided he couldnt take his ute with him. He offered it to me for the cost of transfer which was $37. He had already stripped and repainted the chasis, all suspension components, added power steering,disk brakes with booster,new sills,rst repaired and purchased many components off ebay and elsewhere for the build.Since then I have been spending quite a few hours and dollars on it.
Originally it was a 73 HQ with a 173,cloumn shift trimatic,banjo as per pic below.
More to come just wanna see if I got this photobucket thing sorted first.
Trev...
|
|
|
|
|
|
Rank: Member
Groups: Registered
Joined: 7/03/2010(UTC)
Posts: 10
|
Great ute resto especially the new chevy 350 crate engine. I am starting the install of a similar GM crate engine in a HQ and can see a couple of issues you must have already solved. One is the air cleaner to hood clearance - you seem to have a taller inlet manifold than the standard HQ factory 350 - was that a problem? Secondly, the headers - what model Pacemaker were they and how did the go for clearances around chassis, starter, etc? Could you possibly take a few more photos so I can see how much clearance there is between the headers and the front drivers side spark plug. I have aluminum heads with angled spark plug mounting which supposedly dont have enough clearance around the pacemaker headers Phil
quote:
Originally posted by trev10
About 12 months ago I was offered a deal I couldnt refuse. A mate of mine was moving house and decided he couldnt take his ute with him. He offered it to me for the cost of transfer which was $37. He had already stripped and repainted the chasis, all suspension components, added power steering,disk brakes with booster,new sills,rst repaired and purchased many components off ebay and elsewhere for the build.Since then I have been spending quite a few hours and dollars on it.
Originally it was a 73 HQ with a 173,cloumn shift trimatic,banjo as per pic below.
More to come just wanna see if I got this photobucket thing sorted first.
Trev...
|
|
|
|
|
|
Rank: Member
Groups: Registered
Joined: 7/03/2010(UTC)
Posts: 10
|
Great ute resto especially the new chevy 350 crate engine.
I am starting the install of a similar GM crate engine in a HQ and can see a couple of issues you must have already solved. One is the air cleaner to hood clearance - you seem to have a taller inlet manifold than the standard HQ factory 350 - was that a problem?
Secondly, the headers - what model Pacemaker were they and how did the go for clearances around chassis, starter, etc? Could you possibly take a few more photos so I can see how much clearance there is between the headers and the front drivers side spark plug. I have aluminum heads with angled spark plug mounting which supposedly dont have enough clearance around the pacemaker headers
Phil
|
|
|
|
|
|
Rank: Member
Groups: Registered
Joined: 28/07/2007(UTC)
Posts: 76
|
Phil, Carefull on the multiple posts there mate. Good to hear that someone else is tackling the same sort of coversion as me. Firstly, the air cleaner was supplied with the engine package and yes it did foul on the bonnet so I cut approx 8mm from the air cleaner base lip and then had to panelbeat a couple of areas where the acc linkage and choke levers were. It now clears the bonnet when closed,(but only just). As for the headers, they are Pacemaker. The reciept I have does not give a model no, so you will have to contact them direct for the correct set. Clearance wise, it is a right pain to change plugs as you cant get a plug socket on 3-4 of them, so have to compromise wth spanners etc. Front drivers side has about 5mm clearance, but the worst is the front passenger side. 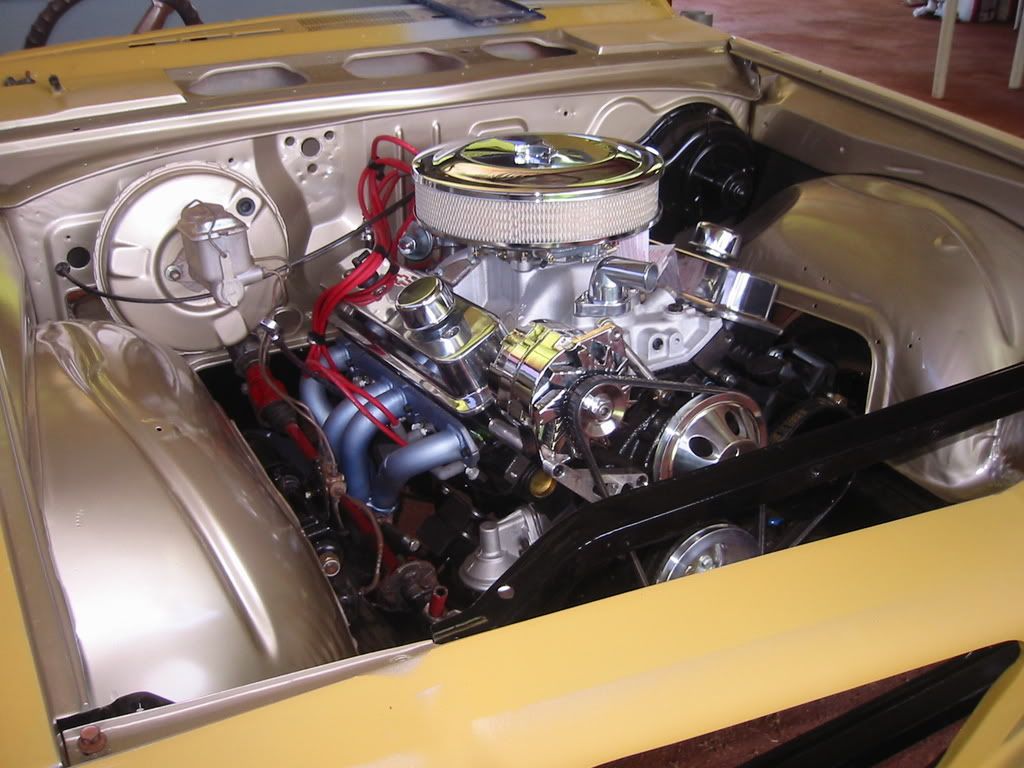 As I use an original chev starter, there is not much room down there, but it does fit. I would suggest a smaller hi Torque starter for the job. Clearance to the chassis is ok, but again, tricky to fit. I remember one side header went in from above, and the other had to be done from below. I will try to get some more photos for you today. It will be interesting to see how yours turns out, perhaps you can post some photos for us as well. What are the stats on your engine, which package did you buy. Cheers Trev...
|
|
|
|
|
|
Rank: Member
Groups: Registered
Joined: 7/03/2010(UTC)
Posts: 10
|
Trev, thanks for your reply. First time on a forum, hence multiple posts. I have gone for the Fastburn 385 engine. Currently have an original (never reconditioned) HQ Statesman factory 350 engine in my HQ GTS. The engine is getting tired and needs a full reco so decided to go for a crate engine instead and will sell the existing 350 engine. While I want to unlock all the potential of the engine with extractors and a good exhaust system, the trouble you have experienced is giving me second thoughts. The existing GM cast iron exhausts on the factory 350 have plenty of clearance and its easy to change the spark plugs. Given your experience I might start off with the existing cast iron exhaust and see how the engine performs.
Phil
|
|
|
|
|
|
Rank: Member
Groups: Registered
Joined: 7/03/2010(UTC)
Posts: 10
|
Trev, I see you have a dual thermo fans in a shroud set up. Who makes that set up? Phil
quote:
Originally posted by trev10
Phil,
Carefull on the multiple posts there mate.
Good to hear that someone else is tackling the same sort of coversion as me. Firstly, the air cleaner was supplied with the engine package and yes it did foul on the bonnet so I cut approx 8mm from the air cleaner base lip and then had to panelbeat a couple of areas where the acc linkage and choke levers were. It now clears the bonnet when closed,(but only just).
As for the headers, they are Pacemaker. The reciept I have does not give a model no, so you will have to contact them direct for the correct set. Clearance wise, it is a right pain to change plugs as you cant get a plug socket on 3-4 of them, so have to compromise wth spanners etc. Front drivers side has about 5mm clearance, but the worst is the front passenger side.
As I use an original chev starter, there is not much room down there, but it does fit. I would suggest a smaller hi Torque starter for the job. Clearance to the chassis is ok, but again, tricky to fit. I remember one side header went in from above, and the other had to be done from below. I will try to get some more photos for you today.
It will be interesting to see how yours turns out, perhaps you can post some photos for us as well. What are the stats on your engine, which package did you buy.
Cheers Trev...
|
|
|
|
|
|
Rank: Member
Groups: Registered
Joined: 28/07/2007(UTC)
Posts: 76
|
Phil,
The fans are (dare I say it) to suit an AU Falcon. I purchased these from Chevpower in Perth. Around $270(not sur if they are still in business). Anyway, easy to wire up using two relays and a temp switch mounted in the valley cover, and they work a treat, and theres no sign on overheating at all. Of course I did also put in a new radiator (4 core from memory).
So hows yours turning out Phil, any progress, photos as yet.
Cheers Trev...
|
|
|
|
|
|
Forum Jump
You cannot post new topics in this forum.
You cannot reply to topics in this forum.
You cannot delete your posts in this forum.
You cannot edit your posts in this forum.
You cannot create polls in this forum.
You cannot vote in polls in this forum.