Rank: Member
Groups: Registered
Joined: 16/06/2011(UTC)
Posts: 65
|
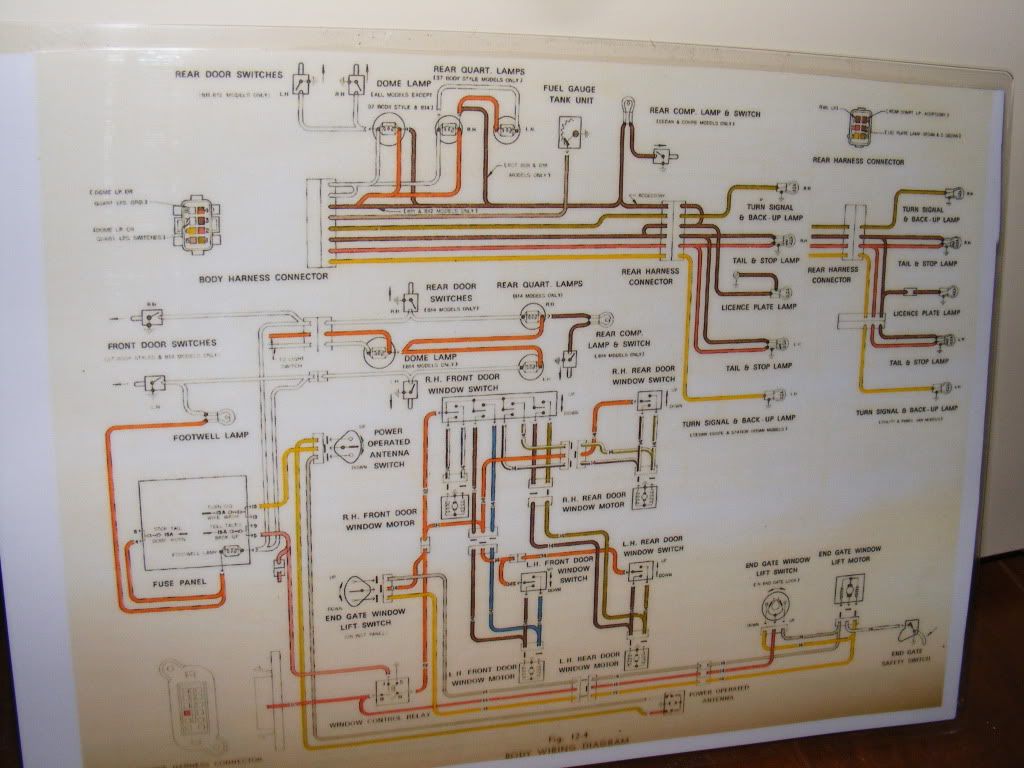
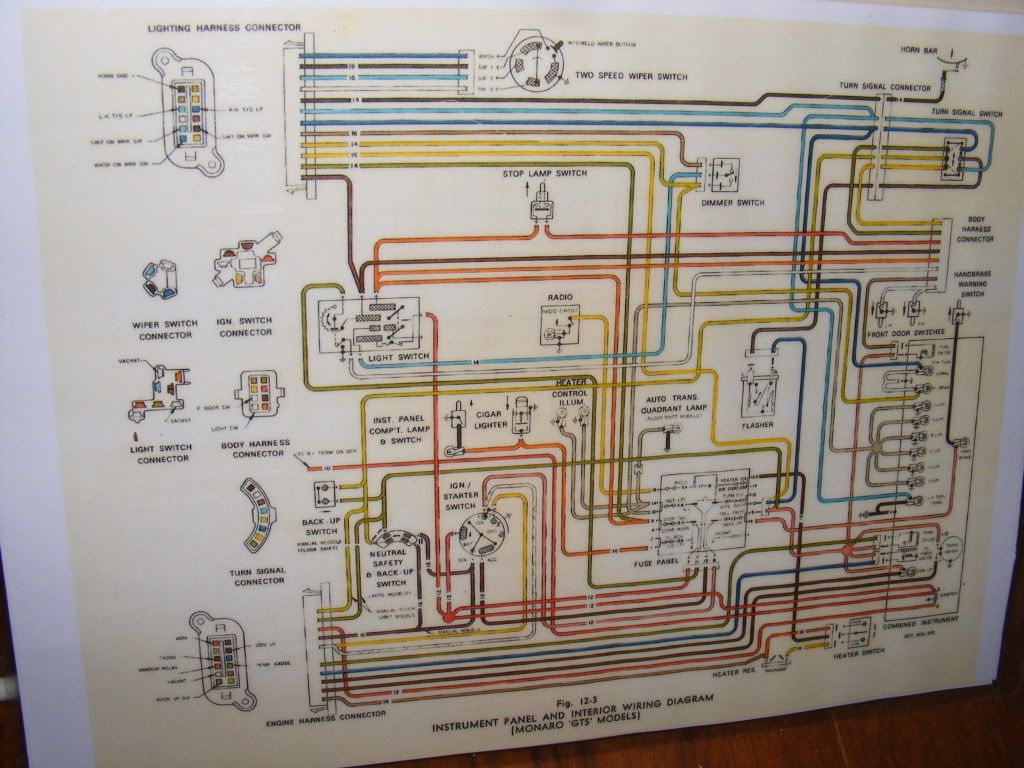
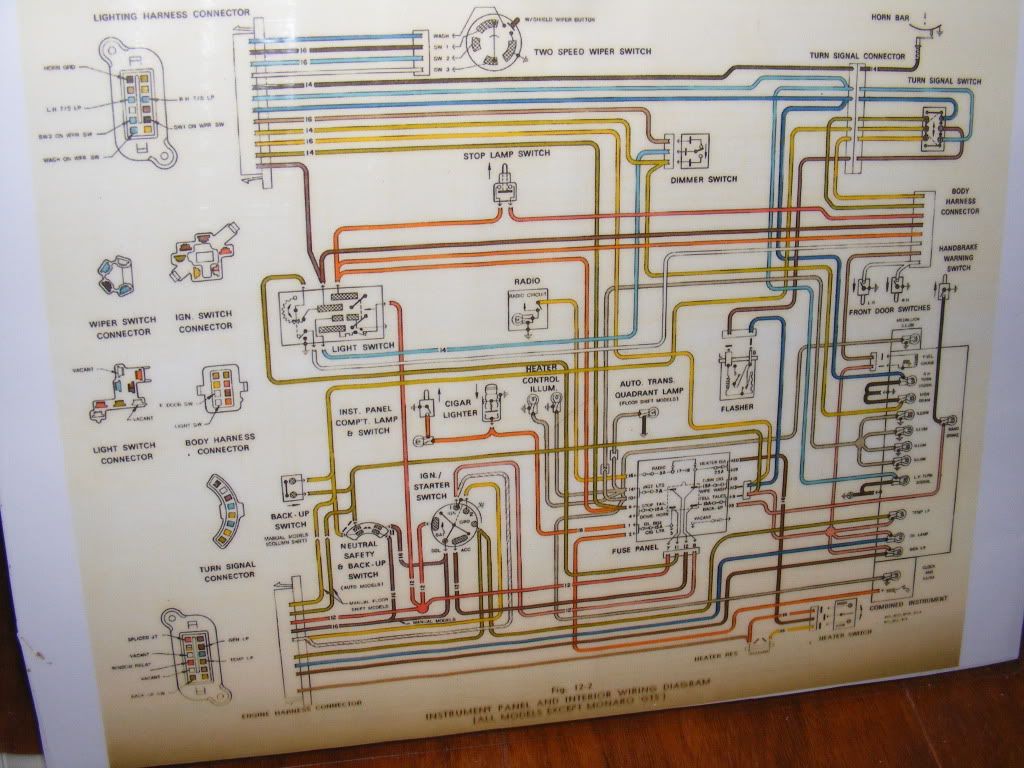
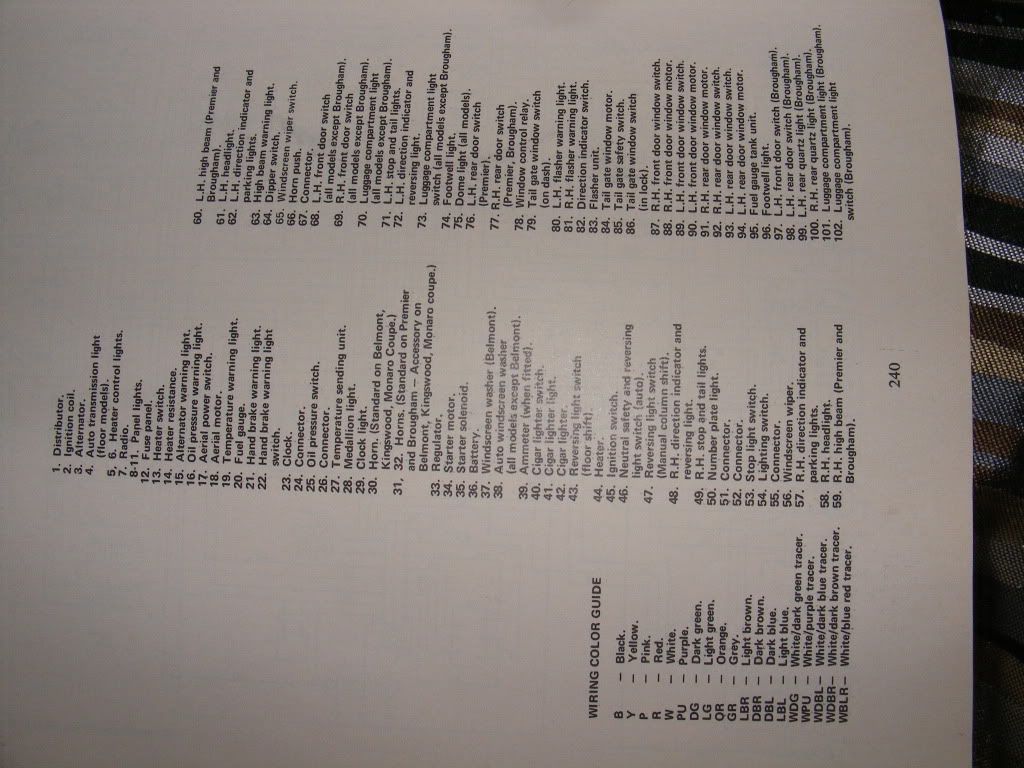
Hey guys im in the process the old subframe tonight i hope i can get it done, ive disconnected all wiring and undone a few tape bits and im worried i wont have the slightest idea what goes where when i go to hook it up, im wondering if there is a stock colour code for what coloured wire goes where. Otherwise i feel im screwed and i need this car back up and running within the next 2 and a bit weeks. god help me.
|
|
|
|
|
|
Rank: Member
Groups: Registered
Joined: 29/07/2006(UTC)
Posts: 766
Location: in the shed
Thanks: 8 times
Was thanked: 14 time(s) in 13 post(s)
|
You wont get much help without telling us what car youre working on. I'll take a stab in the dark and say HQ ?? http://gallery.oldholden...bum192/album194/album71/
|
|
|
|
|
|
Rank: Member
Groups: Registered
Joined: 16/06/2011(UTC)
Posts: 65
|
My bad its a HG Kingswood
|
|
|
|
|
|
Rank: Veteran
Groups: Registered, Veteran
Joined: 10/02/2009(UTC)
Posts: 2,363
Thanks: 2 times
Was thanked: 29 time(s) in 28 post(s)
|
As long as the harness is still complete you will find you do not need know the colours.
These harnesses are designed to be put in by unskilled labour, so when layed into place here will only be one connection accessory that the end of the wire will go onto in that area.
For an HG Kingswood the following are connected to the harness that comes into the engine bay from the driver's well:
One leg goes across the firewall and connects to the wiper motor and washer pump.
The other leg goes over the inner gaurd and across the front of the car and is much longer than the other leg. First wires to horn, then right blinker and headlight, across the front to left blinker and headlight.
The engine wiring is simular, just look at what needs to be connected:
Heater fan if fitted
Reversing wires if 4 speed
coil (yellow)
temp
oil
Starter motor activate
Starter motor permanent active (red with fusable linkl)
You will find these are far enough apart that the wires become obvious.
Cannot remeber which harness the regulator to alternator is in, but would guess as engine harness.
|
|
|
|
|
|
Rank: Veteran
Groups: Moderator, Registered
Joined: 1/03/2005(UTC)
Posts: 6,130
Thanks: 1 times
Was thanked: 232 time(s) in 207 post(s)
|
To add to Warren's comments.
Temp - green wire
Oil - dark blue wire
Coil +ve - yellow
Starter solenoid - purple wire
12V starter - thick red wire
Heater - light tan (short)
Alternator light - brown (goes to meet blue at connector)
Tacho (if factory) - brown (short with spade connector)
Brake fail (if 1971) - light tan (long with bullet connector)
Try to find an HK workshop manual as well as an HT/G supplement, these are invaluable for wiring diagrams etc. They are all in colour in the factory manuals.
Dr Terry
|
If at first you don't succeed, just call it Version 1.0 |
|
|
|
|
|
Rank: Member
Groups: Registered
Joined: 7/07/2008(UTC)
Posts: 328
|
All of the above plus take lots of photos. A good digital camera for less than a $100 and you can even take short videos with the same camera explaining or describing what goes where as you dismantle, just talk to the camera as you go, dont worry about taking too many at the time just take photos and later on delete what is not useful. Careful though with videos they can use a lot of space or memory.....best regards...Jack
|
|
|
|
|
|
Rank: Member
Groups: Registered
Joined: 19/01/2011(UTC)
Posts: 193
Was thanked: 2 time(s) in 2 post(s)
|
These might help. Cant find the coloured dash diagram for the G, might be kicking around the car somewhere, so have included a generic all inclusive diagram. Hope this helps found the other photos and got better pics       Edited by user Wednesday, 14 September 2011 4:41:20 AM(UTC)
| Reason: Not specified |
Stepping stone or stumbling block...your choice |
|
|
|
|
|
Forum Jump
You cannot post new topics in this forum.
You cannot reply to topics in this forum.
You cannot delete your posts in this forum.
You cannot edit your posts in this forum.
You cannot create polls in this forum.
You cannot vote in polls in this forum.


