If the steering wheel was shuddering in tune with the vibration, or you could clearly feel it through the wheel, then it points to front wheel balance. It can also be worn front hubs (sealed bearings) which you can check the traditional way of checking a wheel bearing.
If the car is doing it (but not through the steering wheel) and the rear wheel balance isn't to blame, then look at the tailshaft centre bearing - the rubber on them can fail, letting it droop or flop around, but the vibration usually only occurs on acceleration.
As far as the brakes, here's some tips, in order from what I've found as least required (#3) to most common (#1):
3. Properly diagnosed warped rotors. People pay $$$ to machine supposedly warped rotors, when the real problem is # 1 below.
This is one thing that gets me annoyed - when they put a supposedly warped rotor on the skimming machine, and it takes off a very thin layer - with no high & low spots.
True warped rotors will go "choof-choof-choof" when you machine them, as it goes through the thicker & thinner sections. When it's a constant "Shhhhhhh" noise, it's a good sign they didn't need machining.
However, sometimes they do need machining, but rather than simply take them off and deliver them (or leave the car there & come back), spend some time checking.
Jack it up and take the wheel off. Then decide on simple or detailed methods:
Simple:
Put some large nuts (or spacers) over the studs, and put all 5 wheel nuts back on.
Rotate it by hand, and see if you can feel any tight or loose spots as you spin it.
If it's completely free, use a screwdriver to apply a little force to one of the pads, and see if the 'drag' as you rotate the rotor stays constant, or varies the same way, at the same angle of the rotation (maybe mark the rotor to keep track of this).
Detailed way:
Remove the 2 bolts securing the rotor, and remove the disc - check for debris caught between the rotor & hub. Also spin the front hubs a few times to check for smoothness & tightness. Wire brush it all, and re-assemble.
Put some large nuts (or spacers) over the studs, and put all 5 wheel nuts back on.
If you have a dial gauge, you can use it, otherwise some stiff coathanger wire will do.
Using vice-grips, clamp the wire to the upright just behind the rotor.
Bend the wire so it's almost touching the rotor. Rotate it, and watch the gap. Keep bending it in closer, until it just touches. When it does, the noise it makes as you rotate the rotor should remain the same. If it grabs & wants to bend, you have a high spot, indicating a warp.
2. BA/BF have an adjustable pushrod on the booster that activates the master cylinder. For some reason, on some of them, when things warm up & metal expands (sometimes on cold cars too) it can be a fraction too long, and cause brake drag, which gives a shudder. You need to unbolt the master cylinder off the booster it to access it, and wind it in (shorten it) one full turn. Be careful not to lose the rubber reaction disc if you pull it out (which you'll need to, to hold the main body in a vice or grips. A dot of grease will stick the disc onto the end of the pushrod so you don't risk dropping it on reassembly. I've done this on a few cars that have needed it. The little bolt can be really tight.
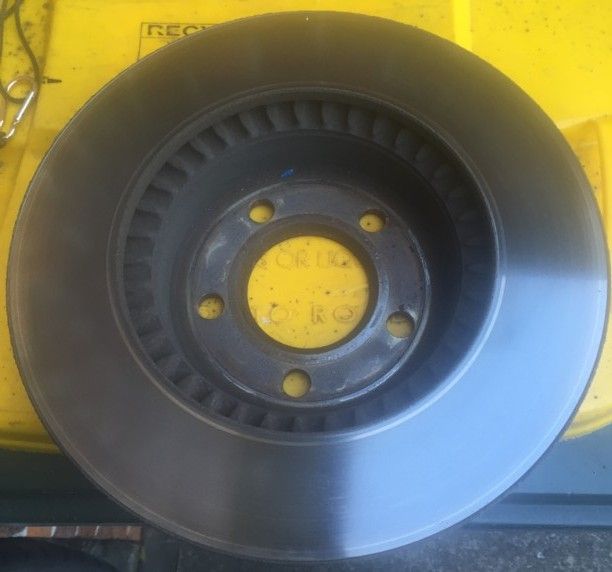
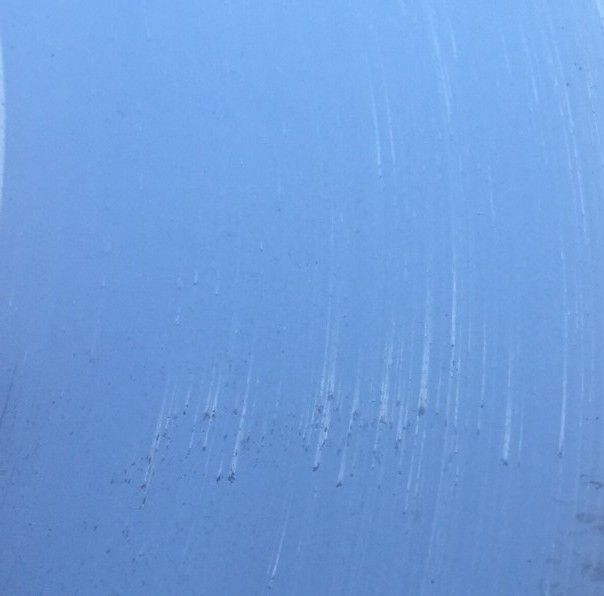
1. Debris/coating/surface contamination issues with the rotor. This is by far the most common thing I come across. I have 2 pics below - both are off my FG at approx 135k.
When you are doing the check for truly warped rotors, inspect the friction area - if there's blotches or other contaminants in the surface, then it's likely this will be the problem, not warped rotors.
I see this very often on Falcons and Commodores. Whilst I can't prove it, the theory is that it is caused by the pads outgassing some of their compounds when they are worked hard - emergency stops, or even just slowing fairly hard for that orange light. The heat causes some of the compounds in the pad material to heat up, releasing gasses, which are trapped between the rotor & pad. As you sit there waiting for the light, the intense heat is localised in that one spot where the pad is, and with the brakes on, there's no way for it to escape. These gasses/compounds then spoil the surface of the rotor, creating a "sticky spot" that causes shudder when the brakes are applied lightly.
To minimise the chances of this happening, I always release the brakes & roll forward a foot or so every few seconds after a hard stop, and I have not had an issue since. Others I have advised to do the same are finding the same positive results too. Cheaper pads also seem to do it worse - with the exception of the ceramic Hi-Q ones, which are good pads, at a cheap price.
While it's true that machining the rotors will cure this - and it does, hence so many people saying "machine your rotors", you don't actually need to go that far. It's only on the very surface, and can be removed with a bit of time and emery paper. I use 120 grit (only because I have a whole roll of it)and work my way around the rotor - just doing straight lines (like 10 o'clock across to 2 o'clock) but all the way round - so you end up with a slightly cross hatched pattern all the way around.
The rotors below were like this at 135,000km, and would cause severe shudder when you touched the brakes lightly to commence slowing down, and even when you were nearly stopped, they'd still grab every rotation. Sanding them with 120 cured it 100%, and I haven't had an issue since then.
Blotches:

"Shooting stars" contamination:


